

How to write CSS style sheets in DreamWeaver design view
Originally written by James Richardson on 12/20/2008

This tutorial will cover the basics of applying styles to an HTML page in Dreamweaver Design View. I say basic because this tutorial is not going to explain advanced CSS. If you want to know advanced CSS then I would recommend not using the Design view of Dreamweaver and studying the CSS syntax. Advanced CSS requires an understanding of the CSS code syntax. You can use advanced CSS in Design view; however, I will not touch that subject here for sake of brevity and for those who don't understand advanced CSS concepts.
With that said, there is nothing worse than a web page that is hacked together with a million styles that make no sense. A web page, with improper styles applied to it, is a webmasters nightmare. These web pages are destined for a redo.This tutorial will cover proper naming conventions and methods of building styles in a style sheet through Dreamweaver's design view . Many people that are new to Dreamweaver tend to make the mistake of creating styles, quite frankly, "wrong". The following is an illustration of incorrectly made styles.
View of DreamWeavers style sheet management
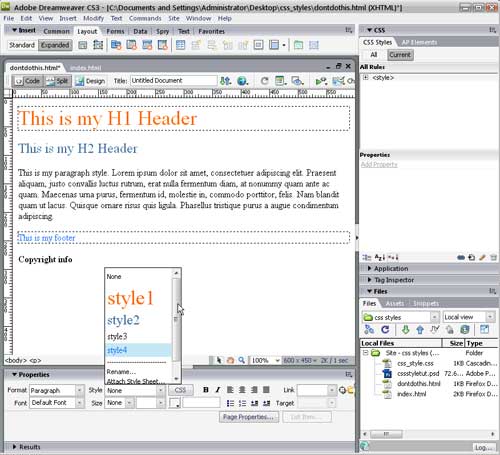
This method of style creation is totally unacceptable and should be remedied immediately before the web page is far into the creation process. If you notice the style list box (Above illustration) has a list of generically named styles like "Style 1, Style 2, Style 3" etc. This is because the styles where created in the Properties panel. This is poor CSS for several reasons.
First, the names are vague and have no meaning to what they are styling. While it is true the style is shown by the size and color in the list box, the styles have been placed in the head section of the document, as apposed to being placed into an external style sheet. This is a severe problem because as the site gets developed, each page will contain styles the other pages do not have. Page 1 might have the "style 1" color orange; but, page 2 might have the "style 1" color as black.
Finding the style that needs to be edited in the future becomes a tedious task for the person who will have to maintain the site. I can go on about how bad this CSS is; but, I will now move the subject and explain how Dreamweaver is set up for style sheets.
Create a new HTML document
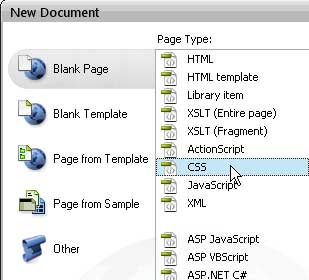
First we will begin with creating a new HTML and CSS document. You make a CSS sheet the same way you make a HTML page. Except you select CSS instead of HTML. You simply go to file/new, select CSS, and click create. (See illustration below)
 After you create the new HTML and CSS file, save the HTML file as "index.html" and save the CSS file with the name "style". You can name them whatever you want; however, these are the names I chose for the tutorial. Naming conventions are important because when you look at the CSS code in the future, the name should tell you what the file or property is. This is good practice, so, It is imperative that you name your properties, rules, and files appropriately. That even applies to your images and HTML pages.
Don't name your web pages "page1, page2, page3" or your images "image1, image2, image3." Name everything with a name that describes what it is.
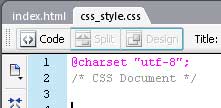
When you are done creating your style sheet, you will see at the top of the Dreamweaver window a tab named "style.css". (See Illustration to the left) This is the file that all of your styles will be saved in. This is the most efficient way to create styles because you will maintain all of your style properties in this one file, instead of strewing them across many different pages. If you have your styles in many different pages, you are going to have to edit each page when you change a style.
With an external style sheet, you just need to edit the style sheet and all of the pages will be changed. Instead of duplicating your code through every page in the head section, all of your code will be saved in one place. This is efficient in every way and you will soon find yourself taking far less time to make minor adjustments to your site than you did before.

Attach the style to your HTML page
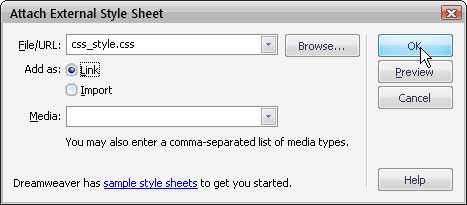
The next thing you need to do is attach the style sheet to your HTML page that you created. You do this by going to the style box in the properties panel. (See illustration to the right) If the properties panel is not there, you can access it by going to Window/properties or hit ctrl+F3 to bring it up. In the style drop down box, select Attach style Sheet. The "Attach External Style Sheet" dialogue box will appear. (See the image below)
Here is where you are going to select the style sheet you just created. Make sure your sheet is in the File/URL box. Otherwise you'll need to browse for it. Make sure the Add as: "Link" radio button is selected and click OK. Now your page has a link to the style sheet in your head section of your web page. You will need to attach the style sheet to each page that you make in the future. You only need make a style sheet once.
You can create multiple style sheets if you want. Making multiple style sheets can help separate your CSS code into categories like, Navigation, Content, Links, and so forth; however, this is for more complex sites.
The CSS Panel
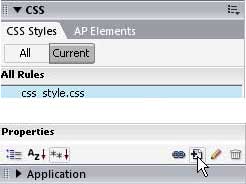
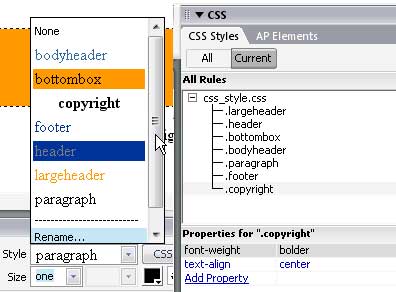
Now you will notice at the top of the CSS Panel, at the right hand side of the program, the "style.css" document in the "All Rules" list. (See illustration to the left) This is where you will be able to edit, create, link, and delete all of your CSS properties. The "All" button shows you all of the available CSS properties in a style sheet.
The current button will show you the properties of the object you currently have selected. The All Rules window shows you the list of CSS rules that you have applied to each object. For Example, a style applied to you header text. The Properties window shows what properties you set to a selected rule. In the Properties window, you can view all of the possible CSS properties that can be attached to your rules. The button with the little "+" sign on a piece of paper is where you create new rules for the styles you want to set. The pencil is so you can edit those rules.
I will go into detail about this in just a moment. Now that you have your style sheet attached, you need to have some kind of information in your HTML document. Once you have some information, you can start attaching different styles to the Web Page.
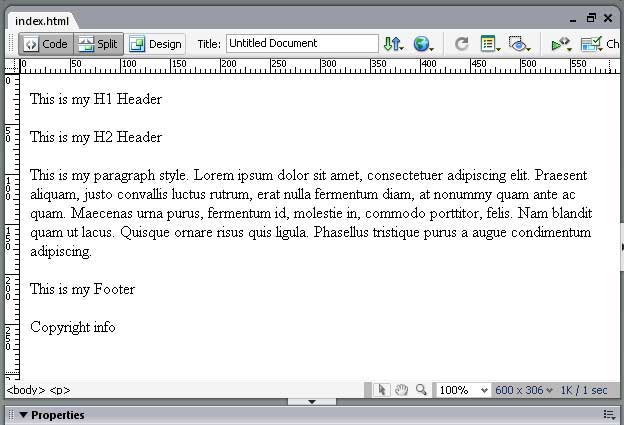
For tutorial purposes, insert the following information into your HTML web page.
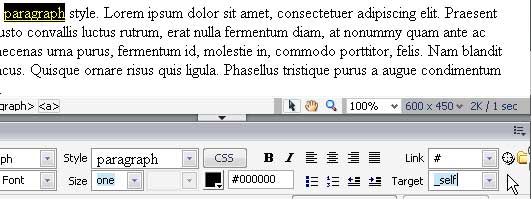
<h1>This is my H1 Header</h1>
<h2>This is my H2 Header</h2>
<p>This is my paragraph style. Lorem ipsum dolor sit amet, consectetuer adipiscing elit. Praesent aliquam, justo convallis luctus rutrum, erat nulla fermentum diam, at nonummy quam ante ac quam. Maecenas urna purus, fermentum id, molestie in, commodo porttitor, felis. Nam blandit quam ut lacus. Quisque ornare risus quis ligula. Phasellus tristique purus a augue condimentum adipiscing.</p>
<p>This is my Footer</p>
<p>Copyright info</p>
Begin to use the styles in DreamWeaver
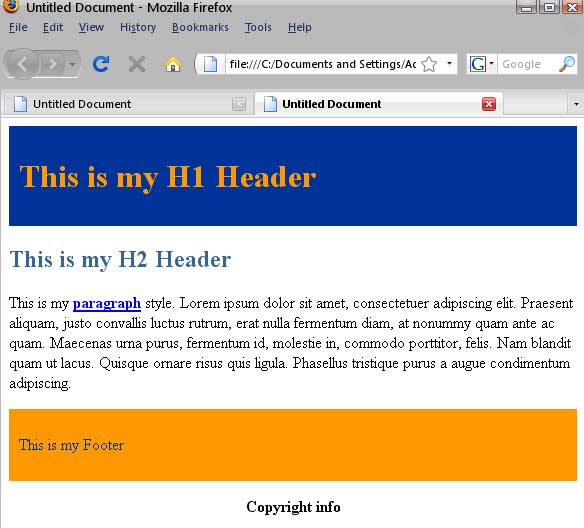
Once you have the content in the HTML document we can now begin to style each of the objects. The page should look like the following image.
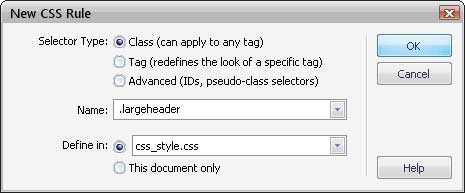
We are going to start with the line that says "This is my Header H1". We will format the text to be the title of each of your pages. Click the "+" icon at the bottom of the CSS panel to open your "New CSS Rule" dialogue box. Once the CSS dialogue box opens (See Illustration Below) You will want to create a class name for this title. Name it "largeheader". The Name box will automatically place a "." dot in front of the name. The "dot" means that the CSS Rule is a class. Every time you see the "dot" remember that it is a class. You can think of it like how high school works, every period is for a different class. Make sure you "Define in" box has your style sheet selected.
The "CSS Rule Definition" Dialogue box
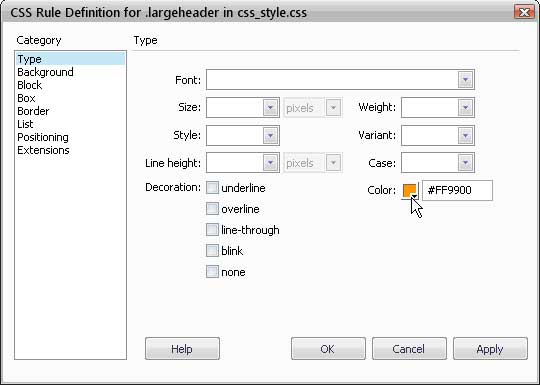
Once you make your class name for your Header title, the "CSS Rule Definition" Dialogue box will appear. (See Illustration below) This dialogue box is for defining the properties you want for your class. I choose to make the text color of the title #ff9900 orange. As you can see from the illustration, there are many different things you can do.
This dialogue box is where you style the HTML document, not the bottom properties panel. Here you can adjust much more than you can with the properties panel. All of your styles are placed in your style sheet, as apposed to your head section of your web page. So for now, we will only change the text color and Select "OK". This places the color into the style sheet, but does not change the text in your web page. I'll show you why.
Apply style attributes to the page
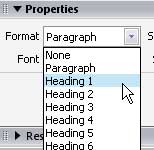
 When a style is created it only places the property into the style sheet. The style drop down menu in the properties panel is where you apply the styles that you created for the object or text itself. This is so you can apply that style to what ever you want in the future. First select the text in the HTML document that says "This is my H1 header." In the properties panel, go to Format and select the Heading 1.(See Illustration to the left)
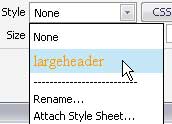
In the Style drop down box you will see the class "largeheader" in the list. Select the "largeheader."(See Illustration to the right) Now you have the title of your page styled as H1 and color #ff9900. Repeat these steps for all of the text in the HTML document. Style each of the following HTML text entities with the following styles.
Format the line "This is my H2 header" with the H2 Format and the color #336699 with class name "bodyheader", the latin "jibberish" as paragraph with color #000000 with class name "paragraph", the "This is the footer" with font-size small and color #336699 with class name "footer", and the "Copyright info" with font-weight bold and color #000000 with class name "copyright". Apply all of those styles and the page should look like the below illustration. Don't forget to save your document as you go.
You will want to "Save All", so the style sheet is saved as well. Remember that the HTML document is a separate file from your CSS document so you'll

Using the color picker in DreamWeaver
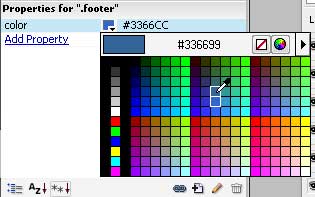
Don't worry if you make a mistake because you can always go back and change the CSS properties in the CSS panel at a later time. You can change the color of the "footer" by going to the properties in the CSS panel and selecting the color attribute. A color picker chart will appear, giving you the option of choosing a color from a list of colors or entering your RGB colors. You can set the "copyright" text to align center in the properties area of the CSS panel. (See illustrations below)

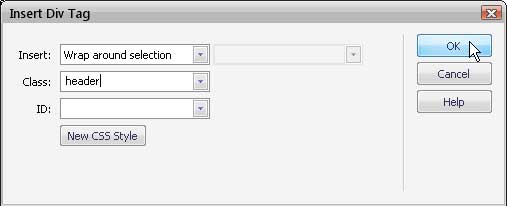
Now, in order for the title to have a color behind it, a div tag must be created around the "This is my H1Header" text. Select the "This is my H1 Header" text in the HTML document and go to the top of the Dreamweaver window where it says "Insert". Select the Layout tab and click the insert "div tag button". The "Insert Div Tag" dialogue box will appear. (See illustration below)
Have the Insert drop down menu with "Wrap around selection" selected and type the name "header" in the Class box, and Click "OK." This will make a class in your style sheet named header and place a div tag around your "This is my H1 Header" text. Remember the text must be selected in order to put the div tags around it.
Adding more properties
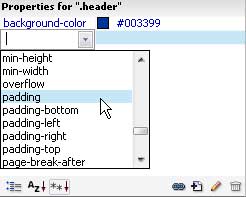
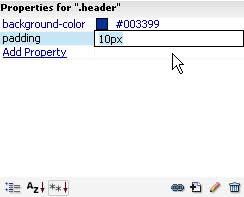
After you insert the div tag, then go to your CSS Panel and select the "header" class. For the properties of the header class, click the "Add Property" link, and select "background-color." Make the background color #003399. Click the "Add Property" Link again and choose padding. Enter 10px in the box for the padding. (see Illustrations below)
This is how you can add, remove, and change properties in the CSS panel. A list of different properties are supplied in a drop down list, giving you all the possible options for properties of that class. Make a div tag for the footer and name its class "bottombox." Give that "bottombox" class the background color the color #ff9900.
Now when we look at the CSS panel there is a list that is identical to the list that is found in the style drop down box in the properties panel.(See Illustration below)
The properties panel is to apply the classes made in the CSS panel and the CSS panel is for creating the styles. It isn't a good idea to create styles with the properties panel.
If you look at the style sheet code, you will see that Dreamweaver generated all of the CSS code for you in the style sheet you created. The illustration below shows you what the CSS code looks like.

Styling links in the CSS panel
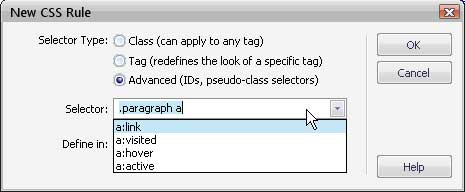
Now I will show you how to use the CSS panel to style a link. In the HTML document, highlight the word paragraph, or any word it doesn't really matter. Make the word "paragraph" or the word you selected into a link. You make this a link by highlighting the word and typing a url in the box where it says "Link" in the properties panel. For tutorial sake, I just typed a "#" sign. You can type what ever you want, but, it must be a valid url or else it will create a broken link. The "#" sign is a reference to the same page. I also made the target "_self" for the link to open into the same window.
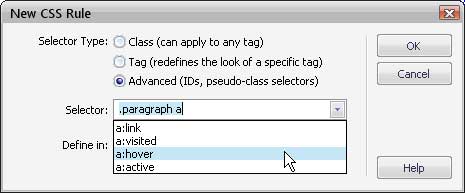
With the text of the link you just made selected in the HTML document, go into your CSS panel and click the "+" button to make a New CSS Rule. In the "New CSS Rule" dialogue box, click the Advanced radio button. It should look like the Illustration Below. In the Selector drop down box. Select the a:link option and click "OK".
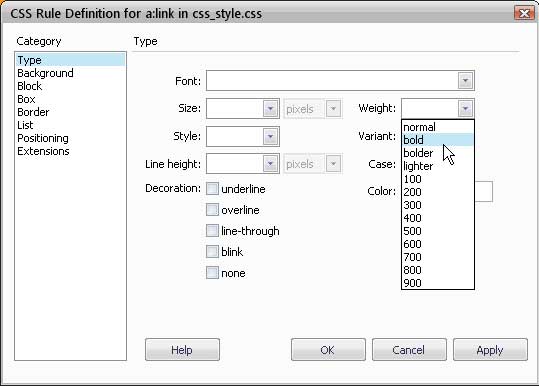
The "CSS Rule Definition" dialogue box will appear. (See illustration below) In the weight drop down menu, make the a:link font weight bold and click "OK".
With the link text highlighted in the HTML document, make another CSS Rule by clicking the "+" icon in the CSS panel. Select advanced again and this time we are going to select the a:hover option. (See illustration below). This time in the "CSS Rule Definition" dialogue box, we will make the hover color #ff0000. This will make the link turn red when the mouse hovers over it.
Final result with basic styles
When you are finished you should have a basic styled web page that looks like the illustration below.
This is how you add all of your styling to your web site using the Dreamweaver Design View. This includes your images, Fonts, Colors, and everything. This is all that will be covered in this tutorial. I hope these style conepts will serve as a basis for you to start making efficient and well formed web pages in no time. If you have any further questions feel free to contact me at the contact page. Thank you and have fun designing.
Check Out my web content
Examples of my blog and forum posts
Examples of my content
InMotion Hosting Articles
At InMotion Hosting, I wrote hundreds of articles and answered countless support questions. Please check out my articles to get a good feel of my technical writing skills.
Web Hosting Hub Articles
I wrote many articles at the Web Hosting Hub support center. Unfortunately, I cannot produce a list of these articles as the Manager at Web Hostiung Hub set my user to Null. You can however see my support questions.
Web Development Links
Recommended Solutions
Copyright © james-richardson.org | Web Design by James Richardson at Absolute Web Dev