
Using MySQL Query Browser
Originally written by James Richardson on 12/20/2008

MySQL Query Browser is a program that is bundled with the MySQL GUI tools. This Program is a great utility for working with your MySQL database. The newest version is for the MySQL 5.1 version of MySQL database. GUI tools consists of Administrator, Query Browser, System Tray monitor, and Migration Toolkit. We will show you how to make a basic database using the Query Browser. The Query Browser is good because you can Create Schemas, tables and fields, edit and insert data into the database, view contents of the database, view and make SQL statements, and has an excellent SQL syntax reference for functions, parameters and more.
If you don’t have the gui tools you can get it here. Download Gui tools
The following tutorial is only a basic understanding. There is much more you can do with the query browser than what is enumerated here. We used the Windows version of the GUI tools; however, the Linux and Mac versions look identical. I will be creating a generic users database that will store information on users that would register in a typical web site. I stripped the database table information to basic field names for the purpose of demonstrating the basic functions of the Query Browser.
Login to MySQL through MySQL Query browser
To get into the Query Browser, click the Query Browser shortcut. The Query Browser Connection Instance window will pop up. If you are using WAMP, LAMP or another Apache/MySQL/PHP program running at the localhost, you will log on with Server Host as localhost and with username as root. If you are using a different host you will need to use the appropriate Host name, username, and password. Of course, the Apache/MySQL/PHP server must be running already before you can log on. The following image is the Connection Instance window.
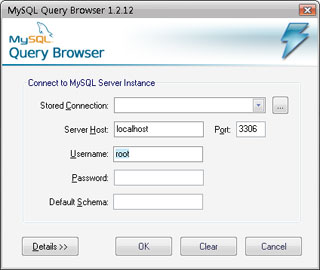
The default schema does not need to be filed out. A pop up window will alert you that no schema was selected. Just close that window as it is not necessary to have the schema selected.When the browser window is open you can select the schema in the Schemata window.
View of initial MySQL Query Browser window
When the connection is established the following window will appear. This is the Query Browser window.
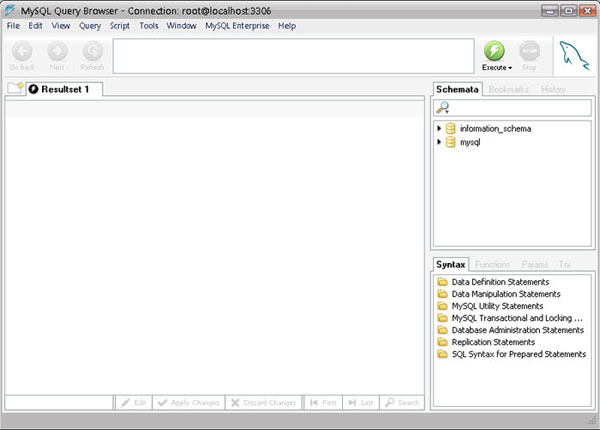
The Query Browser is similar to a web browser in a few ways. There are back, refresh, execute buttons, a tabbed browser ability like most modern browsers, and common menu options at the top of the program. The bar with the large navigation buttons is called the main query bar. The little window in between the Refresh and Execute buttons is the query entry box where SQL statements can be entered. For sake of simplicity, we will not be using or building any SQL statements. The "Resultset 1" tab is where the table contents are viewed.
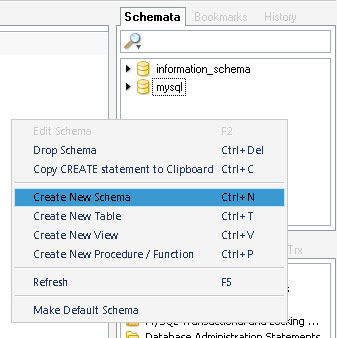
Create a new database
In order to create a new database, you must right click your mouse in the Schemata window and select "Create New Schema" in the popup window or you can use the Ctrl+N keyboard keys.
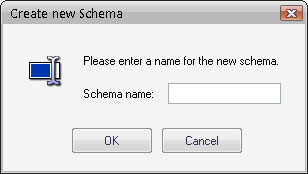
After you click the Create New Schema, the Create new Schema dialogue bow appears. Here you name the new Database.
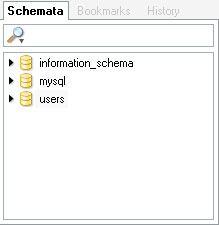
Once you have named your database you will see the new database in the Schemata list to the right of the Query Browser.
Create a table in mySQL Query Browser
Right click the database you have just created and in the popup menu select "Create New Table". This will bring up the Table Editor where you build your table field data.

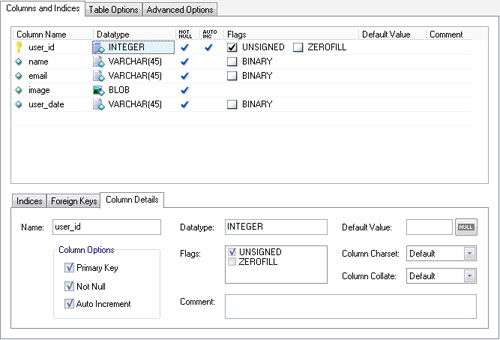
Add table fields in mySQL Query Browser
The image below is the Table Editor. In the table editor you can build your table field data and edit existing tables. Name your table in the Table Name text box and continue to the Column Field names. I named my table "users". In the image below, I named the first column "user_id". MySQL Query Browser automatically set it as the primary key and set it to auto increment as an integer. The tabs below the field names are for changing the data properties in the field rows.
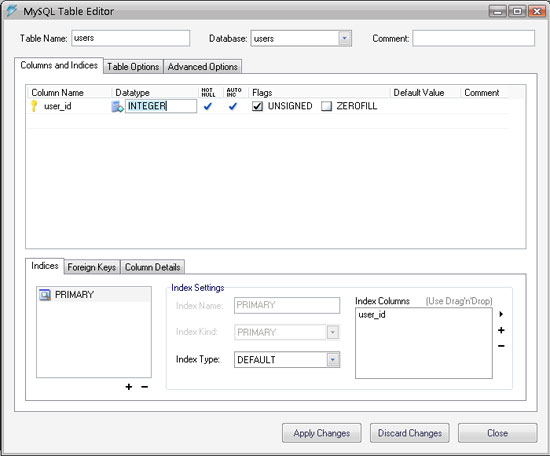
Continue to enter your field names and data types. I made my datatypes VARCHAR[45], which is the default value, and made one field a blob type for storing a small image for the user. If you want to change the size of the characters, you can just type in a different number. For example VARCHAR[255]. In the Column details tab below, you can adjust the datatype, default flags, values, and more.
Editing a table in mySQL Query Browser
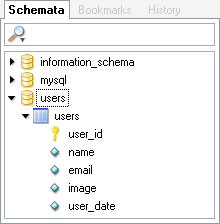
After you make your table you will see the table in the Schemata list. You can view the table and field names in the schemata list. Anytime you want to edit the table you simply right click the table and select "Edit Table."
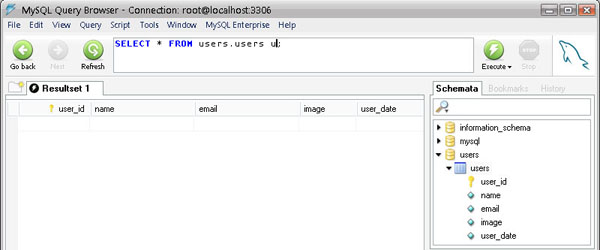
Querying the table for data in mySQL Query Browser
Creating a query on the table is very simple. All you do is left click and hold the left mouse button down and then drag the table into the query entry box. When the table is dragged into the query entry box, an SQL statement is automatically created for you.
In this example, the query created is a simple select query. When the SQL statement is made by dragging the table into the query entry box, click the execute button to the right of the query entry box. When the query is executed, you will notice that the field names are at the top of the "Results 1" tab. Nothing will show up initially because there is no data in the table.
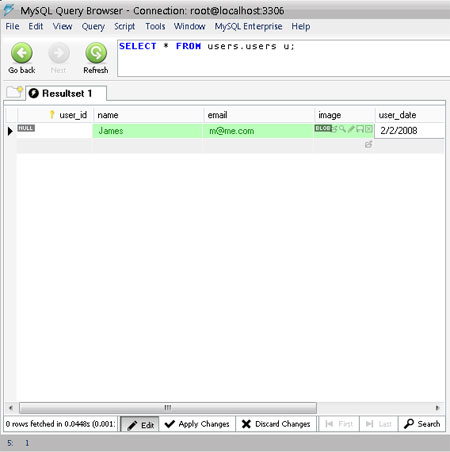
Editing Field data in mySQL Query Browser
At the bottom of the Query Window you will see tabs that say "Edit", :"Apply Changes", and "Discard Changes". Select the "Edit" button. Now you will be able to enter information into the rows of the table. I entered information into the first row. You will not need to enter information into the "user_id" field because this is an auto incrementing integer.
In the image field, the Query Browser will direct you to the place on your computer that you want to get the blob information from. In this case I had a small Google jpeg that I inserted into the database. When you are done inserting the information into the table, select the "Apply Changes" button at the bottom of the Query Window and the table will be saved with the changes that you entered.
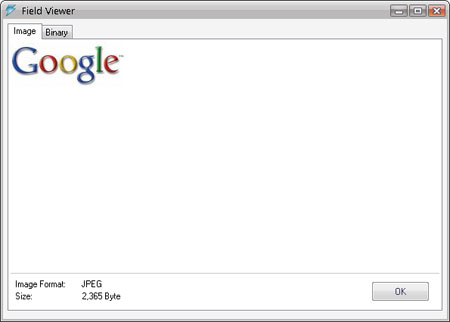
Viewing BLOB or Binary data in mySQL Query Browser
In the image field where I inserted the Google image, there are options associated with that data. The image below is a demonstration of the Field Viewer. This is accessed by clicking on the little magnifying glass that is found in the image field cell. This is the image that I stored as a blob in the users table.
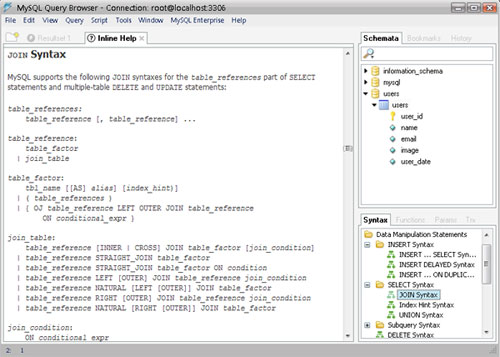
MySQL Query Browser Syntax library
Another great thing about the Query Browser is the complex syntax reference for sql statements. Query Browser helps you make your SQL statements and build your database efficiently. Below is an example of the syntax reference.
This was a basic database creation overview of the MySQL Query Browser. There is much more involved with the Query Browser but this tutorial is focused on bringing you up to speed on the basic functionality of the MySQL Query Browser.
Check Out my web content
Examples of my blog and forum posts
Examples of my content
InMotion Hosting Articles
At InMotion Hosting, I wrote hundreds of articles and answered countless support questions. Please check out my articles to get a good feel of my technical writing skills.
Web Hosting Hub Articles
I wrote many articles at the Web Hosting Hub support center. Unfortunately, I cannot produce a list of these articles as the Manager at Web Hostiung Hub set my user to Null. You can however see my support questions.
Web Development Links
Recommended Solutions
Copyright © james-richardson.org | Web Design by James Richardson at Absolute Web Dev